Building in Foam Sandwich
Disclaimer
This document is compiled by an amateur, not a professional. It has been compiled in good faith, but almost certainly contains errors and inaccuracies. “Best practice” also changes frequently with changes in technology and materials. None of the procedures listed are guaranteed to work, and some or all of them may be hazardous. If you feel unable to take responsibility for your own actions and errors without resorting to the legal profession then you are advised not to read it, let alone build anything based on information here. In any case you are advised not to build a composite boat without someone experienced in the materials to contact for advice
Why Foam Sandwich.
The first thing to realise about foam sandwich construction is that it is easier for the amateur to build a strong light foam sandwich Cherub than it is to build a plywood one. The second thing to realise is that the materials involved are inherently more hostile to humans than those used in building wooden boats, and rather more handling precautions need to be taken. This is especially true for those of us who are used to being up to our wrists in Aerolite 306, with no greater precautions than a bucket of water to wash off acid spills (not that such practices are a good idea). There are two stages in building a foam boat. The first stage is to build the mould or jig that the hull is to be made about, and the second is the construction of the boat itself. The alternatives are to build the boat from a female mould, a male mould or a jig. Building a female mould is a very lengthy business, as it involves making a complete model of the finished boat, absolutely fair, or taking a mould off an existing boat. Renoving the boat from the mould when finished can bring its problems too. However the finished boat needs minimal fairing and finishing, which is why this is the preferred option for batch or series production of multiple boats. A male mould is used if the boat is to be vacuum bagged. If you have vacuum bagging facilities available - and there are ways and means of doing it on the cheap using old freezer pump motors etc - then you won't need me to tell you about the advantages. A male jig - which consists of battens over frames without a solid surface- is used when the layup will be hand consolidated. This is the most popular and probably the simplest option.
Planning the project.
This is vitally important with a foam boat. Whereas with a wood boat you can move fittings about easily, on a foam boat it's a good idea to have plywood or high density foam pads built in at an early stage. It is possible to do this later, but it's hassle. Before you start work out your internal layout as best you can, including any likely changes in the future (!) and draw up a diagram showing exactly where you are likely to want fittings. You can neither screw nor bolt fittings into foam sandwich, no matter how big a backing plate you put on. Building the Jig.
It is often possible to borrow a jig from someone else who has made a boat. In the UK most jigs seem to be used quite a number of times. However if you are building to your own design you have no choice. Spend a considerable amount of time on this. if the mould is not true, fair and symmetrical then the final boat won't be - one or two of the early Bistros are a little crooked about the transom at deck level for this very reason. The mould is normally constructed of 12mm plywood formers at 12“ intervals with battens at reasonably close intervals. Mark out the plywood formers using templates drawn on drafting film, not forgetting to allow for the thickness of your battens. Also build a ply keel former (longitudinal). This is used to help align all the transverse formers. The formers should be screwed down to a pair of rails, 4” by 2“ is adequate, to keep the whole thing solid. Once you are confident that they are all in exactly the correct place you can start putting on the battens. 1/2” square is perfectly adequate for these. Start with the chines gunwales and centre line, double and triple checking that everything is fair. They are best screwed down so you can alter them. Once the main battens are in you should put in sufficient others to support any large areas of foam, especially in areas like the underside where space is critical. Once they are all on it is a case of sanding and adjusting until you have exactly the shape you want. After some 4 months graft you will be in the same position as the someone who is borrowing a jig! If you have vacuum bagging facilities then there are considerable advantages in constructing a male mould, basically just by putting a layer of plywood over the battens. This is filled and faired, covered with parcel tape and then inner skin, foam and outer skin successively bagged down on top of this.
Picture - Part Built Boat [Photo - Paterson 7 under construction © Bloodaxe Boats]
The jig needs to be at a reasonable working height. On the one hand you need to be easily able to work on the middle of the hull, but on the other hand you don't want to have to bend down all the time.
Materials.
One advantage of being an amateur is that time is less of a constraint. If a pro goes a couple of days over building a boat than he doesn't eat for a few days, whereas an amateur just doesn't get to sail so quickly. Therefore there is less need to compromise on materials in favour of speedy construction. The other factor is that you are saving so much money on the cost of a new boat that it is easier to spend a bit more money on the constituents. Foam.
8mm or 10 mm Airex, Termanto or Divinycell is normally used. If you have both then use the thicker gauge for high load areas such as the space frame and the bottom of the hull. The hull floor and the false floor should be 75/80kg/m3 for dent resistance, but 55kg/m3 is adequate for topsides and other verticals. Many people use the same density throughout. Use the heavy foam for sidedecks and anything else likely to be exposed to the dreaded trapeze hook! Pads for fittings can be made from 200kg/m3 foam. The size of the bubbles in the foam and thus the hollows in the outer surface will affect how much resin and filler you use, and thus the weight and cost of the boat. Airex is generally considered best for this.
Fibres.
Rudyard Kipling wrote “There are nine and sixty ways of constructing tribal lays And every single one of them is right!”
Exactly the same applies to Cherub fibre lay-ups these days. If you talk to people about fibre lay-ups you will get about as many opinions as people you ask, some of them contradictory! There are several choices of fibre lay-up that will work well. Most boats now are either glass with local carbon or all carbon, but part Kevlar lay-ups have their fans too and certainly seem to lead to bullet-proof boats. The different fibre combinations have different characteristics, and different people seem to have different experiences. Kevlar is always a pain to wet out, and cannot be sanded, but has superb impact resistance. Carbon can give wetting out problems, isn't too great on impact resistance, sands well and provides the stiffest boat. E Glass is cheap and easy to work with, with reasonable impact resistance. Glass is probably the best choice for a first boat with a hand consolidated wet lay-up. All-carbon boats are much better vacuum bagged. All else being equal a glass boat will come out about 5kg heavier than a carbon one, but you should still easily be able to get under the minimum weight limit.
Glass.
There are two lay-ups in common use, one being two layers of 200g/m2 E-glass on the outer shell inside and out, and the other 1 layer of 300g/m2 with a second layer on the outside skin only over the bottom of the hull. The main fibres should be arranged at 45 degrees to the centreline, but where there are two layers the second layer should be 0/90. The best weaves to use are either 45/45 bi-directional or crows foot. Bi-directional is strongest and easy to use. Crows foot weave is very easy to shape and might be a bit cheaper. Standard weave is difficult to get to run over corners and chines, and also weakest. It's a good idea to add some local carbon reinforcement to an all glass shell. Unidirectional carbon tape is the favourite, as it is very easy to use. It should go in the areas subject to heavy loads from the rigging, front bulkheads, space frames etc. You should put it under the outer layer of glass in order to avoid sanding it all off again when you fair the boat.
Carbon.
A good lay-up is 200g/m² carbon plain weave, inner skin at ±45°, outer skin at ±45° with an extra layer at 0°/90° over bottom, 500mm from stem to 1m from the transom. Then add a thin layer of 100g/m² glass which adds thickness and protects the carbon from being removed during the fairing/sanding process…- if it goes black, stop sanding!
Kevlar/Carbon
If you want to go for a Kevlar skin on the undersurface - and this could be a good idea if you launch on lots of stones and the boat gets bashed a lot, then use the above lay-up, substituting a skin of 165g/m2 Kevlar for the 0°/90° carbon layer above, and run it from stem to stern. You need to be especially careful in the fairing stage to make sure that you don't cut through the glass into the Kevlar, because the ends of Kevlar will not sand off, but stick out through the fibre as a light fuzz. Not Smooth.
Resin.
The major choice is between polyester and epoxy. Polyester is cheaper and easier to use, Epoxy is more expensive, but makes for a much longer lived boat. Polyester also smells absolutely disgusting, and as far as I am concerned is right out if you are building the boat in the living room or a garage attached to the house. On the other hand epoxy is mildly carcinogenic and can cause allergic reactions, but in both cases it is important not to get the stuff on your hands. Barrier cream and plastic gloves are firmly recommended. Epoxy is recommended unless money is really tight or for some reason (perhaps a wild idea you want to try) you're not that bothered about longevity. In any case only use polyeseter with a primarily glass boat. Scott Bader (Strand Plastics) are a good supplier for polyester resin and SP Systems are most commonly used for Epoxy.
There are many epoxy resin formulations and the one you should use does depend on your facilities. SP Ampreg 20 is the most commonly used. However if your are vacuum bagging Ampreg 22 has advantages in health and safety terms provided that you have a heated workshop - it can get very viscous at low temperatures, and especially provided that you can keep it stored at an even temperature. It reacts very badly to getting cold, although all epoxy formulations will suffer if stored outside their recommended range.
Epoxy resins like to be post cured, which basically means heating the structure up quite a bit for an extended period of time. There is much more in the suppliers' handouts and technical documents - here are some references.
Building The Boat.
Attaching the foam to the jig.
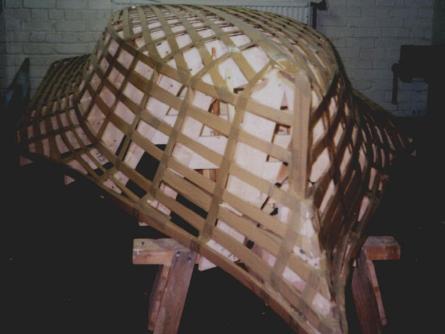 First cover the jig with plastic sheet to stop the foam getting glued to the jig - most embarrassing. Obviously don't get any wrinkles on the battens because it will stop you fastening it down properly. Next attach the foam. Tie it on with wire, the handiest to use is probably 1.5mm PVC coated (inner core of telephone cables! ). Use large pieces of foam where possible, but where there is much curvature - bow etc. - you will need to use smaller pieces to prevent it cracking as it is bent. Take a lot of trouble over this, get it absolutely flush to the battens, and keep gaps between sections to an absolute minimum. At this stage you should put ply or high density foam pads in where any fittings will go - bow fitting, shroud plates, etc.
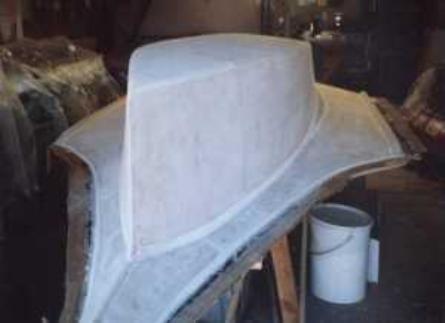 Next you should fill all the gaps and fair off the foam. Use lots of very light filler as all this is adding unhelpful weight. Be careful fairing off the foam, it is very easy to sand away lots of foam and leave the filler standing proud ! All raised portions must be lost, but small shallow dents don't really matter too much. Once all the foam is in place, all gaps filled, and all is fair - check 3 times! - coat the foam with a mixture of resin and microballoons or litecell. The aim is to fill all the open cells on the surface with light filler, otherwise it will get filled with heavy resin when you put the glass on. The best tools to apply this are a one-foot plastic ruler or a piece of Formica with a straight edge.
The Outer Skin.
Apply the laminates next. Use a brush and a consolidating roller to ensure full impregnation - which can be a problem with Kevlar - and good resin to glass ratios. Remember you need enough resin to fully impregnate the fibre, but any more is just parasitic weight. Peel ply can be used and is very effective. Supposedly you can get a peel ply like nylon fabric from dressmakers which works nearly as well. I think I might be a bit wary of something like that in a vacuum bag lay-up though! A resin to glass ratio of 1.1-1.3:1 is achievable with polyester, and 1.8:1 with epoxy.
The Inner skin.
Once you have done this cut all the wire ties and turn the hull over. It will be very floppy (don't panic!) so support it in a good cradle. This can be used as the basis for a trailer when you've finished the boat. Put some extra reinforcement around where the centreboard case will come.
Space frames and bulkheads.
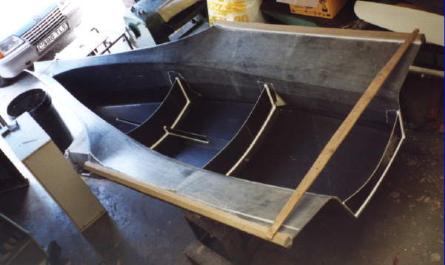 These can be made outside the boat and cut to shape and fitted later. Even if you don't have vacuum bagging you can (because they're flat) still compress them while they are curing. Do this with a couple of sheets of flat wood (chipboard is fine), covered with melinex - polythene may wrinkle. Put one piece on a flat floor, add your lay-up, and put the other sheet on top and weigh down with anything to hand - I used the last 5 years of Yachts and Yachting and Boards magazines. If you can't get melinex readily use Parcel tape - yes, the brown stuff! Epoxy won't stick to it so its great for these sorts of jobs. It can even be used instead of a release agent on moulds. You do - of course - have to be very careful not to get wrinkles and creases in the tape when you stick it down. Bulkheads can have one layer of 200g glass (or carbon) each side, but the space frame and high load points should have uni-directional carbon reinforcement under the glass. The bulkheads can be glued straight in with epoxy fillets, but the space frame should be glassed in to distribute the loads. It should hit your ply pads too!
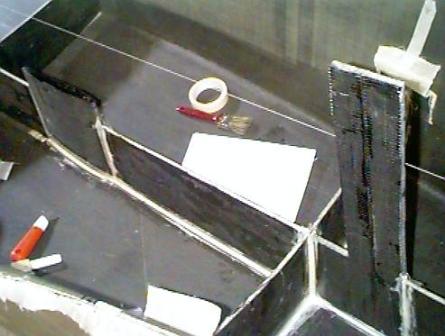 The exact layout of bulkheads depends on your fibre lay-up. A carbon boat needs less in the way of internal bulkheads. Below the floor a Glass boat will at least have a full length central spine, a bulkhead under the mast, one at the back of the daggerboard case at the mainsheet takeoff and one in the middle of the helmsman's stamping area. There's not normally a need for an extra bulkhead in front of the mast, but it is good to add some extra reinforcement as this area takes a pounding upwind in a chop.
Daggerboard case.
Use 55kg/m3 foam if you have it. Glass one side of the foam and allow to cure. Then bend each half of the case around the daggerboard and clamp in place. Don't forget the parcel tape/plastic sheet to stop it sticking. Glass around the outside, then remove the board and cut the case down leading and trailing edges. Coat the inside surface with a gel-coat type layer, preferably with graphite in, so that the fibres cannot get worn down. The two sides are then spaced apart a bit with foam or wood, and the whole lot glassed together again.
Decks and Interior.
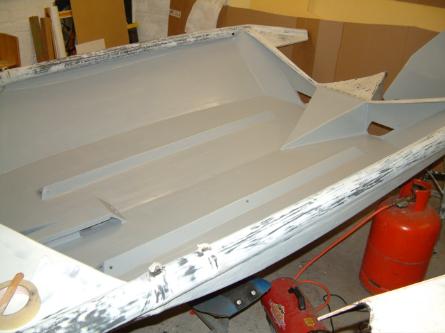 Made in much the same as the bulkheads. You can use a jig - especially if you are making neat rolled side-decks, or use the bulkheads as a jig. Don't forget pads where fittings will go - jib sheets, cleats etc. etc. Get the parcel tape out again to hold the decks down!
There are currently three interior layouts in use. Most common is still the traditional flat side-deck and side tanks with a slightly concave false floor. However there are also two variations on the “scooped deck from side to side theme. Andy Paterson builds his boats without side decks at all. The false floor comes up to the point where topside meets flare, and the crew sit on the inside of the outer skin. An alternative is to have a steeply raked in side deck which meets the false floor in the same way, but still having a side deck.
If you are opting for the side deck less route you will have to have a substantial gunwhale structure to stiffen up the boat as you won't get the box section effect from the tanks. However in all cases there is a considerable advantage in having a gunwhale arrangement that leaves a lip under the topside. When you have capsized and inverted the boat you need to climb on top. This is lots easier if there's a nice lip at the edge to rest your feet on.
The False Floor and Finishing Touches
Use 75kg/m3 foam. This area is prone to dents (!). Glass on the bottom layer before you put it in the boat, using one layer of 200g/m3 glass. Put a fair bit of light resin/filler paste on top of the bulkheads and weigh it down (Y&Y again ?) until it is cured. Once it is firmly attached you can put the top layer of glass on. Use two layers of 200g/m3. Leaving the top layer off while you attach it leaves the floor more flexible while you fasten it down. Lastly run an extra layer of glass over the gunwale where hull and decks join, partly to keep the whole thing together, and also to give some abrasion resistance for rigging on concrete and to help protect against unplanned impacts from solid objects! Odd brackets for fittings etc can be jigged up on little moulds/jigs made from wood covered in parcel tape, but its easy to spend hours making little jigs to not much benefit. There's a lot of mileage in making up a largish bit of foam coated in glass each side and cutting things out of that. If you are compressing down small bits with jigs then, even if you don't use it for the big jobs, peel ply is recommended. It can make a big difference to how neat the bits come out and how much finishing work is needed, which is a big plus if its an awkward shaped bracket.
Fairing and smoothing
Absolutely crucial of course, not for strength but for boat speed. Use the lightest filler you can afford, mix it in resin, and spread it on as evenly as you can. A plastic ruler is very good for this. Once it is cured you can start sanding it all off again, the aim being to get down to a fraction of a millimetre above the top layer of cloth. In practice you are bound to end up sanding some cloth off, but make sure it is the very bare minimum. If you have a layer of Kevlar you must not expose it. Kevlar doesn't sand off - it leaves little fibres sticking out !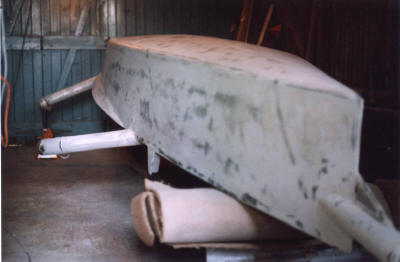 Different jobs on the boat need different fillers. Fillets and things need some colloidal silica for strength - a mix that is solely bubbles is very soft. For really high load applications, and especially in tension, microfibres are great, but they soak up a lot of resin and so get heavy.
You can load up the resin with a great deal of filler - if you are simply filling with no need for strength then it can be almost “dry”. Be aware that these mixes are very soft though, so if the area needs dent resistance you will need to have some silica and a higher percentage of resin in the mix and accept the weight penalty.
The lightest fillers are plastic bubbles - Fairlight or something similar, but are very soft. Microballoons - - the brown phenolic resin bubbles - are significantly stronger.
For really serious filling you can make a brushable filler. Make up a reasonably thick filler mix - still a bit “sinking,” maybe 80% of maximum amount of filler you can mix in, and then add a little epoxy solvent - proportions perhaps 50cc resin, 250cc filler and 20cc of solvent and you have a brushable filler that will sand off readily. An adequate substitute for epoxy solvent - at least for cleaning and so on, is a general purpose industrial solvent of 90% methanol, 5% xylene 5% toluene.
Cost & Time.
It will take you in excess of 200 hours to build a hull once your jig has finished. Most people seem to take about 4 months to fit it all in including fitting out etc. Foam sandwich is a more expensive option than wood, but the final total will depend tremendously on materials. As of 2001 the materials cost is probably about UK£1200 for a glass/polyester boat, going up to UK£1750 for an epoxy/carbon hull. In the US it works out at around US$2600 for a predominantly carbon boat.
If you don't want to do the whole job yourself, whether through lack of time, skill, or inclination, an obvious alternative is to start with a part built shell. Quite a nice option is to buy a shell complete with false floor, which means that the trickier jobs are done.
Jim Champ.
This article was compiled in 1991 with the help of Dave Roe, Alistair Cope, Bill Deeley, Simon Baker and Simon Roberts, and updated slightly in 1998 and 2000 with help from numerous others, including Robin Russell, Matt Searle, Andy Paterson and David Lee. Especial thanks to Andy Paterson for teaching me about Parcel Tape!
If you wish to have fuller construction details for building a foam sandwich boat then it would be worth considering purchasing a set of plans from Bloodaxe Boats, which contain much more detail than is practical to include here.